

Crochet Lesson #5: Changing Colors
In this fifth lesson, we will learn several ways to change colors in a crochet project.
🇫🇷 Vous préférez lire la version française ? C’est par ici !
Nyaossu !
Today we are going to learn how to change colors in a crochet project.
I will show you several methods.
I) Classic color change :
This is the basic method, and it is also used when changing yarn after finishing a skein.
However, it has a small downside: since amigurumi are usually crocheted in a spiral, the shift between the two colors can sometimes be visible.
This may be part of the desired look, but when you want a perfectly straight color change, it can be a bit inconvenient.
You can absolutely use only this method and become a master of hiding the color changes by assembling your pieces in a way that makes them less visible.
You can also alternate with another method that is more discreet, which we will see later in this article.
Text 1
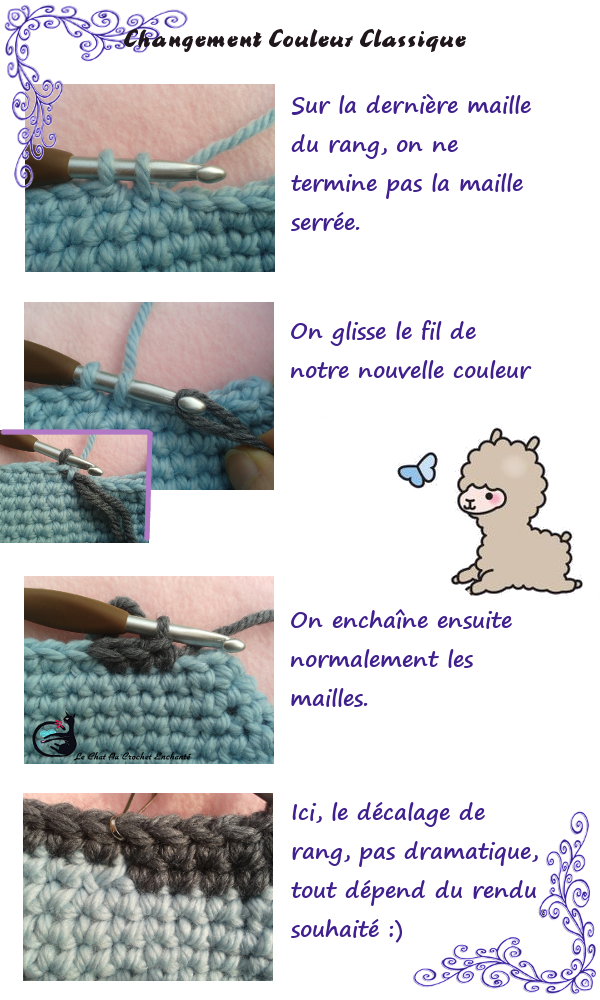
On the last stitch of the round, do not finish the single crochet.
Text 2
Insert the yarn of the new color.
Text 3
Continue crocheting normally.
Don’t forget to secure your yarn tails properly !
Text 4
Here you can see the round shift.
Not dramatic — it all depends on the result you want 🙂
II ) Invisible color change :
We now arrive at the invisible color change.
In truth, many different techniques exist.
Everyone has their own little trick to reduce the shift between rounds and make the color change look cleaner.
This method requires a bit more manipulation and attention than the classic color change.
Here I present the method I personally use.
It begins with an invisible fasten-off, a technique that can also be used to finish crochet pieces.
(We will come back to this topic in a future dedicated article.)
For this invisible color change, the goal is to create a “false stitch” to reduce the visible shift.
As you can see, crochet is also about adaptation: the more techniques you know, the more you can choose the best one depending on your project.
Enough talking — here is the tutorial in images !
👁️🗨️ Here is what it looks like in practice


Text 1
On the last stitch of the round, remove your hook and enlarge the loop to leave enough yarn
(about 10 cm / 4 inches to be safe).
Cut the yarn.
Text 2
Thread the yarn onto a yarn needle.
Insert the yarn under the second stitch of the next round
(from front to back of the work).
Text 3
Then bring the yarn back into the last stitch of the previous round,
inserting it only through the back loop.
Adjust the tension so that this new “false stitch” has the same size as the others.
Text 4
Secure the yarn by weaving it through the stitches of your work.
Make sure to keep the correct tension so the stitch stays properly adjusted.
Otherwise, the stitch may become too loose and create a hole in your work.
Text 5
Take the yarn of your new color and continue crocheting normally.
Result
The shift between rounds is much smaller than with the classic color change.
Here is what it looks like in practice :
III) Color changes in back-and-forth rows :
To finish this guide on color changes, here is one last small tutorial for projects worked in back-and-forth rows.
Text 1
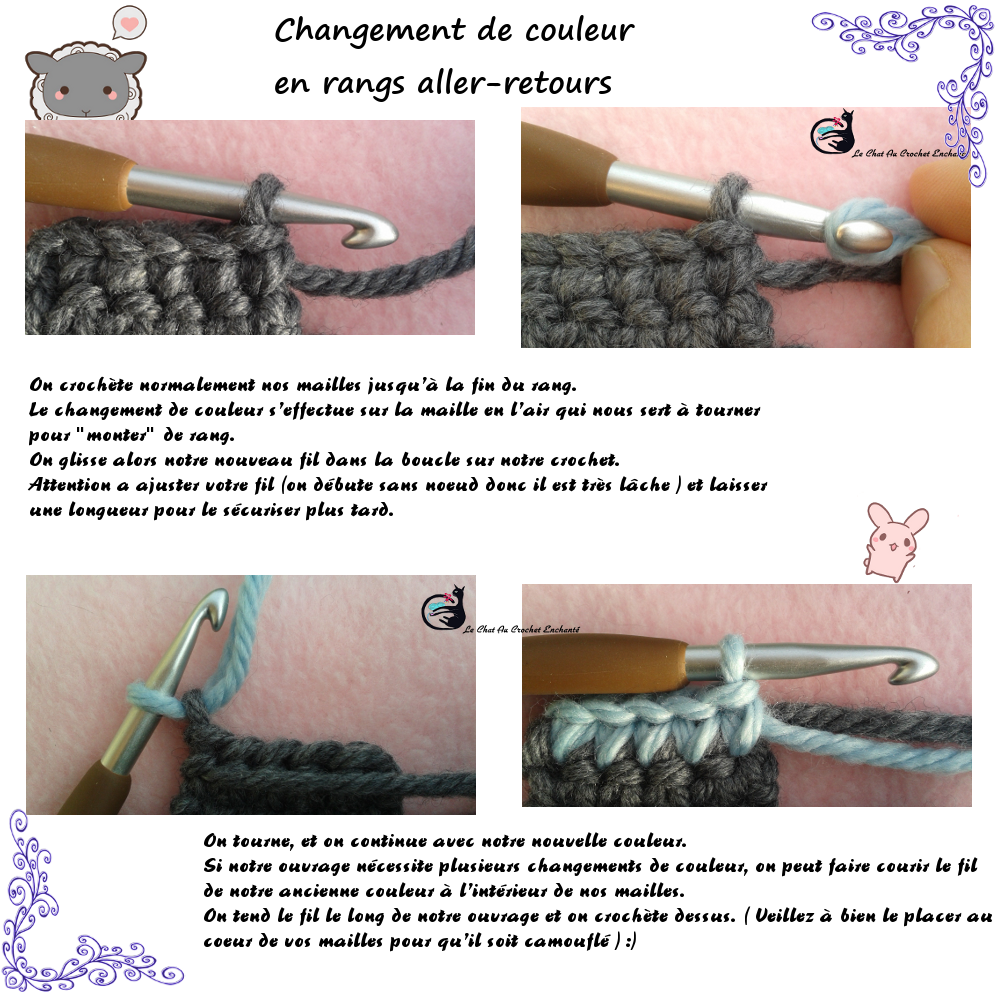
Crochet normally until the end of the row.
The color change is made on the chain stitch used to turn and
start the next row.
Insert the new yarn into the loop on your hook.
Be careful to adjust the yarn tension (since we start without a knot it will be loose) and leave a tail to secure later.
Text 2
Turn your work and continue with the new color.
If your project requires multiple color changes, you can
carry the unused yarn inside the stitches.
Lay the yarn along your work and crochet over it
(make sure it stays inside the stitches so it remains hidden).
This small guide gives you the essential techniques
for changing colors. (^・ω・^)
For a color change in the middle of a round, simply use the classic method.
Next lesson
👉 Lesson n°6 – Half double crochet & double crochet
The blog needs your support!
For tips, click on the little cup (´,,•ω•,,)♥

Thank you so much for your support!
Un commentaire à partager ?